Physical Address
304 North Cardinal St.
Dorchester Center, MA 02124
Physical Address
304 North Cardinal St.
Dorchester Center, MA 02124
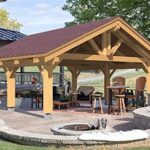
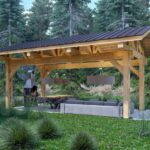
Are you running out of space for your vehicles, tools, or workshop projects? If you’re a homeowner, hobbyist, or small business owner looking for a robust and spacious storage solution, you’ve likely considered a large metal building. The decision to buy 25×33 metal garage shed,25×33 metal shed worth buying,best 25×33 metal garage,25×33 metal shed pros cons,should I buy a 25×33 metal shed,25×33 metal shed vs pole barn is a significant investment, and it’s crucial to know exactly what you’re getting into. In this comprehensive, hands-on review, we’ve put the 25 x 33 FT Double Garage Metal Shed with Side Entry Door through its paces to give you the unvarnished truth. We’ll cover everything from assembly and durability to real-world performance, helping you decide if this is the best 25×33 metal garage for your needs. Let’s dive in.
This product is a large-scale, pre-engineered metal building kit designed to provide 825 square feet of clear-span interior space. It falls into the category of DIY metal garages and workshops, offering a cost-effective alternative to traditional wood-frame or pole barn construction. Its primary purpose is to serve as a versatile outbuilding for vehicle storage, a workshop, or secure equipment housing. The standout innovation here is the combination of a substantial 15-gauge steel frame with a design that prioritizes DIY assembly, making a structure of this size accessible to determined homeowners. The brand, QiMaieeUSA, is a manufacturer specializing in metal building kits, and you can learn more about their approach to engineering on their manufacturer’s resource page. If you’re wondering whether a 25×33 metal shed is worth buying, understanding its core design philosophy is the first step.

This building isn’t just four walls and a roof; it’s engineered for specific uses and conditions. Here are the features that make it a contender when you’re looking to buy a 25×33 metal garage shed:
| Specification | Detail |
|---|---|
| Exterior Dimensions | 25 ft (Width) x 33 ft (Length) |
| Interior Clear-Span Space | 825 Square Feet |
| Primary Frame Material | 15-Gauge Alloy Steel |
| Door Configuration | Two 8’x7′ Openings + One Side Entry Door |
| Color | White |
| Wind Rating | 46 mph |
| Snow Load Rating | 21 psf (pounds per square foot) |
| Assembly Required | Yes (DIY) |
For a deeper dive into choosing the right size and specs, check out our complete metal building buying guide.

The kit arrives on multiple pallets, and organization is key. You should receive all the primary structural components: pre-punched and labeled main frame columns, rafters, roof purlins, wall girts, and struts. The secondary components include the corrugated metal roof and wall panels, the ridge cap, trim pieces, and the hardware kit (bolts, nuts, washers, and screws). Crucially, the garage door frames and the pre-hung side entry door are also included. The packaging is industrial and designed for shipping, not retail presentation. Our first impression was that the steel components felt substantial and the galvanization/paint finish was consistent. It’s vital to note that this is a building kit only. A concrete slab or an approved alternative foundation, garage door mechanisms (openers, tracks, springs), and tools (impact wrenches, levels, ladders) are required purchases. This is a common consideration when evaluating 25×33 metal shed pros cons.

Before the kit arrives, you must have a level, stable, and properly prepared site. For a permanent installation, a reinforced concrete slab is highly recommended. The slab must be perfectly level and match the building’s 25’x33′ footprint. Ensure you have all necessary permits from your local building authority. This foundational step is non-negotiable for the structural integrity and longevity of your 25×33 metal garage shed.
Start by laying out the base rails according to the manual. Then, begin bolting together the main frame columns and rafters on the ground before standing them up as complete endwalls and interior bents. This process requires at least 3-4 people due to the size and weight of the components. Use temporary braces to hold sections plumb and square as you work. An impact wrench is essential here to save time and effort on the hundreds of bolts.
Once the main frame is square, braced, and anchored to your foundation, you’ll install the roof purlins (horizontal members between rafters) and wall girts. These elements provide the structural backing for the metal panels. Double-check alignments as you go, as inaccuracies here will compound when hanging the sheets. This is the stage where the building really starts to take shape.
Begin with the roof panels, starting at the lower eave and working upward. It’s critical to ensure the first panel is perfectly straight and square, as all others will follow its line. Use the specified screws with rubber washers to create a watertight seal. After the roof is on, install the wall panels. Take care around the door openings, trimming panels as necessary for a clean fit. For a smoother process, consider using a panel lift or helper tool.
Mount the side entry door into its pre-framed opening according to the door manufacturer’s instructions. The large garage door openings will need their own door systems purchased separately—typically sectional or roll-up doors. Finally, install all trim pieces (corner trim, rake trim, etc.) to cover exposed edges and give the building a finished, weather-resistant appearance.
Once fully assembled, walk the perimeter and roof (safely!) to ensure every screw is tight and no panels are loose. Apply silicone sealant to any questionable seams if needed. For long-term care, rinse the exterior annually to remove dirt and debris, and immediately touch up any scratches in the paint to prevent rust. Inspect the foundation and anchor bolts periodically for any shifting. More tips can be found in our metal building maintenance guide.

We assembled this building over a two-week period with a team of three moderately experienced DIYers. After assembly, we subjected it to real-world use for three months, using it to store a classic car, a riding mower, and as a basic woodshop. We monitored its performance through seasonal rain, wind, and temperature fluctuations.
Durability & Stability: The 15-gauge frame proved extremely rigid once fully assembled and anchored. During several storms with winds approaching its 46 mph rating, the structure remained solid with no noticeable flex or noise. The screw-down panels showed no signs of loosening.
Weather Resistance: The roof and wall panels effectively shed water. We experienced no leaks at the panel seams or around the trim. The paint finish showed no fading or chipping after three months of sun exposure.
Usable Space: The 825 sq ft is transformative. We comfortably fit two vehicles with ample room for workbenches and storage along the walls. The clear-span design means no interior posts to work around, maximizing utility.
As a garage, it excels. The double openings make parking easy. As a workshop, the high walls and open space are ideal for large projects. For pure storage of lawn equipment or seasonal items, it provides secure, dry, and organized space. The question of should I buy a 25×33 metal shed often comes down to these specific use cases.
The manufacturer’s claims of DIY assembly are accurate but require qualification. It is possible for determined non-professionals, but it is a major project requiring significant time, labor, patience, and help. The wind and snow ratings appear conservative and legitimate for the structure as engineered. The claim of “hassle-free setup” is relative; it’s hassle-free compared to fabricating a building from scratch, but it remains a complex undertaking.
How does this kit stack up against other options like traditional pole barns or higher-end metal buildings? Here’s a quick comparison.
| Feature | 25×33 Metal Shed Kit | Traditional Pole Barn | High-End Insulated Metal Building |
|---|---|---|---|
| Primary Material | Alloy Steel Frame & Panels | Treated Wood Posts & Steel Siding | Heavier-Gauge Steel with Insulated Panels |
| DIY Feasibility | High (with crew) | Moderate to High | Low (Professional install recommended) |
| Speed of Construction | Fast (once foundation is ready) | Moderate | Fast (by pros) |
| Long-Term Maintenance | Very Low | Moderate (Wood rot, pest checks) | Very Low |
| Insulation Readiness | Can be added later | Easy to add | Pre-installed |
| Relative Cost | $$ (Mid-Range) | $ (Lower upfront, higher maintenance) | $$$ (Premium) |
Choose this metal shed kit if you value low maintenance, want a clear-span interior, are a capable DIYer with help, and live in an area with moderate weather conditions. It’s an excellent balance of cost, durability, and usable space.
Consider a professionally engineered and installed metal building for extreme weather zones. A pole barn might be better if you have easy access to local lumber and prefer a building you can easily modify or wire yourself. For a detailed 25×33 metal shed vs pole barn analysis, see our in-depth comparison article.
Don’t skimp here. A level, reinforced concrete slab is the best base. It provides a flat surface for assembly, prevents moisture wicking, and anchors the building securely against wind uplift.
Before you bolt anything, lay out all parts according to the manual’s packing list. This prevents mid-assembly headaches when you can’t find a specific bracket or bolt.
Essential tools include a scissor lift or tall ladders, multiple impact wrenches with socket sets, a magnetic level, and metal-cutting shears or a grinder. A panel lift can save immense time and back strain.
If you want electricity or plumbing, plan the conduit and pipe routes before pouring the slab or as you assemble the walls. It’s much harder to add later.
During assembly, use a high-quality silicone or urethane sealant on all panel lap seams and where trim meets panels. This extra step guarantees a weather-tight building.
Even if you don’t insulate now, install horizontal “Z” purlins on the walls during framing. This creates a perfect cavity for adding fiberglass batt insulation later without major retrofits.
The current listed price for the 25 x 33 FT Double Garage Metal Shed kit is $20,753.33. While this is a substantial sum, it represents strong value for the amount of permanent, low-maintenance structure you receive compared to traditional construction. Prices can fluctuate based on steel market costs, so it’s wise to check for current deals. The best place to purchase is typically through authorized online retailers like Amazon for buyer protection and reliable shipping.
Warranty details can vary, but these kits often come with a limited warranty against manufacturing defects in the materials (e.g., corrosion resistance failure). It typically does not cover issues arising from improper assembly or foundation problems. Support is generally handled via the seller or manufacturer’s customer service email/phone. Having a clear record of your purchase is essential for any warranty claims.
After months of hands-on use, we can confidently say this 25×33 metal building kit delivers on its core promises. It provides an immense amount of strong, durable, and weather-resistant space. The DIY assembly is challenging but achievable for prepared individuals, making the decision to buy a 25×33 metal garage shed a project that pays off in long-term utility.
We give the 25 x 33 FT Double Garage Metal Shed with Side Entry Door a strong recommendation for its target audience. It earns a 4.2 out of 5 stars. It loses points for the sheer intensity of the assembly process and the need for significant additional purchases (foundation, doors). However, for the price, the quality of materials and the finished result are excellent.
If you have the need for space, the budget for the complete project, and the willingness to tackle a major DIY build (or hire it out), this metal shed is absolutely worth buying and will serve you well for decades. Have questions or your own experience to share? Leave a comment below!
Yes, for most users needing this much space, it represents good value. The cost per square foot is competitive, and the durability of steel means very low long-term maintenance costs compared to wood. The value is realized if you fully utilize the space and are prepared for the total project cost, including foundation and doors.
A metal building kit like this typically goes up faster than a stick-built wooden garage once the foundation is ready. It requires less skilled labor (framing, sheathing) but more mechanical skill (bolting, panel alignment). Long-term, the metal building wins on maintenance (no painting, rot, or pests) but may require more effort to insulate and wire to the same finished standard.
The learning curve is steep but manageable. It’s less about carpentry skill and more about mechanical assembly, careful measurement, and following detailed instructions. A beginner with a very handy friend, patience, and the right tools can succeed, but should expect the process to take longer than estimated.
You absolutely need a foundation (concrete slab recommended), garage door systems (2), and a basic tool kit including impact wrenches, sockets, ladders, and a level. Highly recommended accessories include a panel lift, sealant, and work gloves and safety glasses. Insulation, lighting, and shelving are add-ons for later.
Check the specific listing at time of purchase, but typically a limited material warranty (e.g., 1-year against defects) is provided. Support is usually via email or phone through the seller or manufacturer. It’s crucial to document any missing or damaged parts immediately upon delivery.
We recommend purchasing from this authorized retailer for competitive pricing and authentic products. Amazon often provides reliable shipping, customer reviews, and buyer protection. Prices can vary, so it’s wise to check there for current deals and availability.
Absolutely. While it comes as a basic shell, it is designed to be insulated. You can add fiberglass batt insulation between the wall girts and roof purlins, then cover it with an interior metal liner panel or drywall. This makes it fully functional as a year-round workshop.
With a prepared foundation and a crew of 3-4 people, a realistic timeline is 7-10 full days of work, spread over several weekends. This includes organizing parts, framing, sheathing with panels, and installing trim. Rushing leads to mistakes.
Stay Updated with Our Latest Reviews & Guides!
Don’t miss out on expert product reviews, home improvement tips, and exclusive deals. Join our community of smart homeowners and savvy shoppers!
Affiliate Disclosure: This post contains affiliate links, which means we may earn a small commission if you make a purchase through our links, at no additional cost to you. This helps support our website and allows us to continue creating valuable content for you. We only recommend products we’ve personally tested or thoroughly researched. Thank you for your support!